Download a new song from ESL KidStuff: The Family Song
 The Family Song
Song Theme: Saying different members of the family.
Target Vocab: father, mother, brother, sister, grandfather, grandmother, family, hello, how are you?, I’m fine thank you, See you soon.
Song Length: 2:30
A really nice song for very young learners with family finger puppet play.
(Members can log in to download the full song)
Lyrics:
Verse 1:
Hello father, Hello father,
How are you? How are you?
I’m fine thank you, I’m fine thank you,
See you soon, See you soon.
Verse 2:
Hello mother, Hello mother,
How are you? How are you?
I’m fine thank you, I’m fine thank you,
See you soon, See you soon.
Verse 3:
Hello brother, Hello brother,
How are you? How are you?
I’m fine thank you, I’m fine thank you,
See you soon, See you soon.
Verse 4:
Hello sister, Hello sister,
How are you? How are you?
I’m fine thank you, I’m fine thank you,
See you soon, See you soon.
Verse 5:
Hello grandfather, Hello grandfather,
How are you? How are you?
I’m fine thank you, I’m fine thank you,
See you soon, See you soon.
Verse 6:
Hello grandmother, Hello grandmother,
How are you? How are you?
I’m fine thank you, I’m fine thank you,
See you soon, See you soon.
Verse 7:
Hello family, Hello family,
How are you? How are you?
I’m fine thank you, I’m fine thank you,
See you soon, See you soon.
Gestures and activities to use with “The Family Song”
For this song students use finger puppets (download and cut out the puppets):
- before the song, help everyone to put on the puppets – there are 6 puppets altogether, 3 on each hand.
- as the song plays, students wiggle the puppet for that particular verse (e.g. in Verse 1 it is “father”) and sing along.
- for the last verse (family) students wiggle all of their finger puppets
Using “The Family Song” in class
This is an easy song which introduces students to the words for different family members. This is a great song and lesson to teach little ones as they completely understand the concept of family.
NOTE: if possible, ask the parents before class to arrange for their kids to bring in family photos – parents, grandparents, brothers, sisters, themselves. Also, bring in a few family photos of your own.
- Do “Teacher’s Family Photos Time” activity. If you can bring in photos of your family, this is a great activity to do. Also try to encourage your students to bring in photos of their family – you’ll need to arrange this with the parents before the lesson. If you can’t bring in photos, see the alternative below.
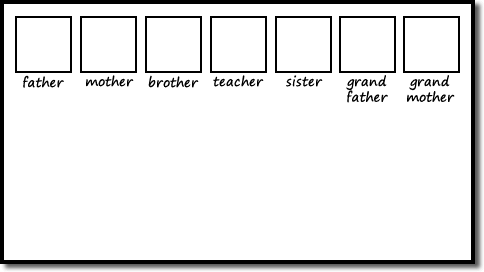
Draw 7 squares on the top of your board in a row (see image below). Hold up a photo of yourself and ask “Who is this?”. Elicit that it is you, stick the photo inside the middle square and write your name under the photo. Next take out another photo (e.g. your father) and again ask “Who is this?”. Elicit and teach the family vocab and stick the photo in one of the squares and write the word (e.g. “father”) under the photo. Do for all of the following: father, mother, brother, sister, grandfather, grandmother – you may not have some of these family members, but for the sake of this lesson, use photos of friends, etc., and pretend they are your brother, grandmother, etc.

Your students will really enjoy seeing your family photos and will probably ask questions – feel free to extend the information you give on your family members, especially if it reviews previous lessons, such as ages and jobs. Also, you can practice/review describing vocab (e.g. blond hair, big eyes, etc.).
Alternative: If you can’t bring in family photos: instead of using your family photos, cut out pictures of people from magazines and pretend they are your family members. Younger kids will generally believe you (and may even be quite impressed!).
- Do “Students’ Family Photos Time” activity. If your students have brought in photos of themselves and their families, this is a great activity to do. If not, go to step 3.
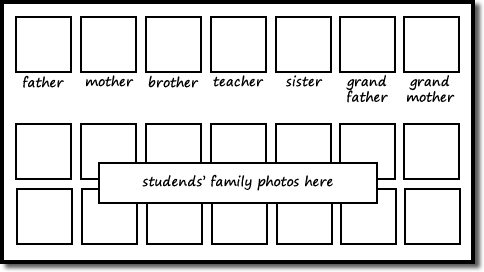
On the board, under the row of 7 photos of your family you are going to place photos from each of the students’ families. First, hold up the photos of the students in your class and elicit who they are – each time, stick their photo in the middle column and write their names underneath.
Next, you are going to play a guessing game – hold up a photo of one of your student’s family members (e.g. Hugo’s sister) and get everyone to guess whose family the person belongs to. Elicit family vocab (e.g. “It’s Hugo’s sister“) and place the photo on the board in the correct place (e.g., for Hugo’s sister, it would go in the row of Hugo’s photo and in the sister column).

Keep holding up randomly selected photos of your students’ family members and placing on the board until your board is full of family photos.
- Make “My Family Tree” Posters. Give out a piece of colored construction paper / card to each student. They are each going to make a family tree poster of their family. Begin by demonstrating the activity – with a green and brown crayon draw a large tree, filling up the whole piece of paper. At the top write in large letters “My family”. Then, either stick your photos family photos onto the tree or draw pictures of your family (grandparents at the top, next your parents and you and your siblings at the bottom). Finally, under each family member photo/picture write the vocab (grandfather, mother, etc.).
Now get your students to do the same. If they brought in photos they can use them on their poster – if not, encourage them to draw pictures of their family members. Students can copy the words from your poster (display it clearly).
Finally, have each student pin their poster to the walls of the classroom. Ask each student questions (e.g. Is that you mother? What is your brother’s name? How old is your sister?).
NOTE: Depending on the level of your students you can have them write more information about their family members on the poster (e.g. names, ages, jobs, etc.). Students can even draw pictures of their pets.
- Make and play with Finger Puppets. For the song we are going to use finger puppets (craft sheet here). Before class, print and cut out the finger puppets. We have color and black & white versions of the craft sheet – if using the black & white version, have your students color in the puppets before starting the song. Then attach the puppets to each students’ fingers by taping the straps around the finger – 3 puppets on each hand.
Next, check everyone understands which puppet is which – say “Everybody wiggle grandfather” – make sure you are wearing your finger puppets as well so you can demonstrate. Go through each puppet, wiggling fingers. Then play a quick game: say “Wiggle the sister” and everyone has to quickly wiggle the right one. Do for a few rounds until everyone has got the hang of it.
- Sing “The Family Song”. Play the song and sing along – wiggling the correct puppet for each verse (e.g. verse 1 is “father”). If everyone enjoyed the song, play it once more.
- Play “Finger Puppet Conversations”. By now, everyone should have the idea of the structures from the song, so we are going to have some fun role-plays with the finger puppets. First model with one student. Hold up one finger puppet (e.g. mother) and get the other student to hold up one finger (e.g. grandfather). Role-play a fun conversation, for example:
T: Hello grandfather.
S: Hello mother.
T: How are you?
S: I’m fine, thank you. How are you?
T: I’m fine, thank you. See you soon.
S: See you soon.Then you can change finger puppets and do the conversation again. Depending on level, you can also throw in a few more questions, such as, “What’s your name?”, “How old are you?”, “Where do you live?”, etc.
Now the class can role-play. Put everyone into pairs and set a timer to one minute. Shout “Start!” and the pairs should role-play with different puppets until the timer goes off. Then shout “Change partners!” and everyone finds a new partner for another one-minute conversation. Keep going for a few rounds.
- Set Homework: For homework, give out the “My Family” worksheet.
Related Stuff:
- Download all songs
- The Hello Song and The Goodbye Song
- The Numbers Song
- The ABC Song
- Head, Shoulders, Knees & Toes
- The Rainbow Song
- Old MacDonald
- What Can You Do?
- The Feelings Song
- The Days of the Week Song
- Months March song
- How Did You Get Here Today?
- Mr. Shape Head
- Let’s Go to the Zoo
- What Fruit do you Like?
- Where are my Things?
- The Morning Routines Song
- If You’re Happy and You Know It
- What Time is it?
- What’s Wrong? What’s the Matter?
- Numbers 1-20 song


